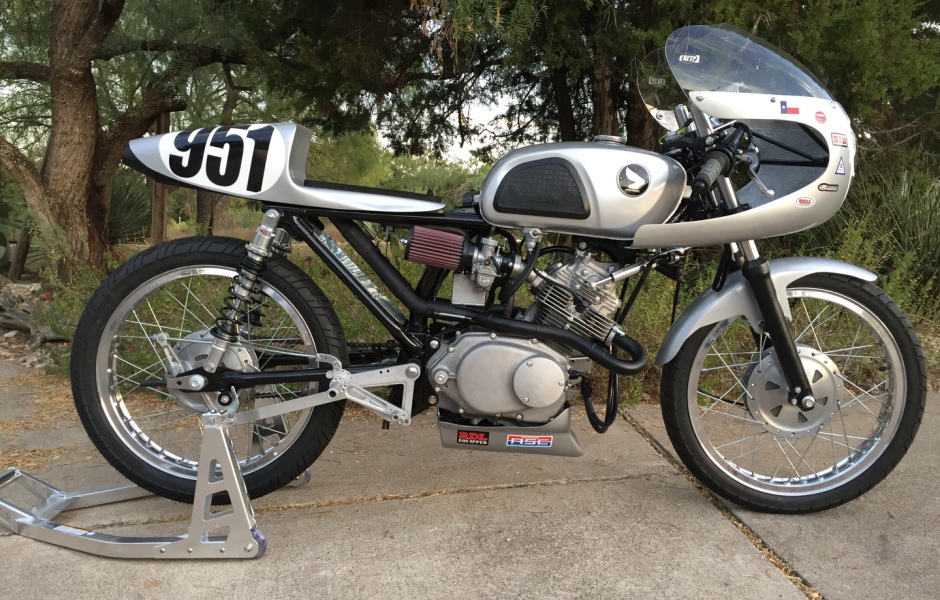

CB350K1
The Story Behind this 1969 CB350 Race Bike
With so many custom, one-off Harleys on the road, and no desire to own or ride one, I wanted to build my own custom motorcycle to showcase my workmanship and creativity. (Those goofy chopper shows on TV are a joke.) Bringing a 1969 Honda CB350 back to life - with a blend of vintage and new components, in a functional and rideable form - would satisfy my mechanical and nostalgic desires. Here’s how it all shook out.
I had been searching, on and off, for a 1960s Honda for some time. My inconsistent inclinations would come and go and I was never very serious due to lack of space, too many other partially put-together motorcycles and limited project time. The model I wanted had to be pre-1970 since I graduated from Harlingen High in ’69 and classmate Becky E. was captured sidesaddle in the 1969 HHS yearbook on a sparklin’ new CB350. Honda’s rapid growth and the evolution of the product were quite impressive during this decade. My first impulse was to find a CL160 or CL72 (I love Snuff-or-Nots), and I have a soft spot for scrambler pipes. But after experiencing all the various vintage bikes around Austin, and checking out a new Triumph Thruxton one day on South Congress, I knew exactly what I needed: a CB350 café racer. The first brand new bike I owned back in ’70 was a 1971 SL350K1. I raced motocross and hare scrambles on that ‘tank,’ and had 2 buddies who owned SL350s. Gary had red K0, and traded for a red K1 after I bought my orange one and Bill took delivery of a blue K1. We called ourselves “the 350 Bitchits,” along with John who had a ’70 CB350. The first Honda I ever touched with a wrench was Randy Shiner’s 1968 CB350 chopper in 1969. It needed points and timing work, and I made it all better. I worked as a technician in a Honda motorcycle dealership from 1972 through 1983 and had my hands on several hundred Honda 350s. I also bought a 1970 model and personalized it (red K3 gas tank and 2-into-1 Hooker pipe) during the mid-‘80s. The 350 was an astonishing machine. There were hundreds of thousands sold, it was reliable, and the engine was/is a thing of beauty, both mechanically and cosmetically.
I started ogling at photos of CB350 café racers on line in September of 2010 and stumbled onto one that just made me stop and admire. My initial search, during the very first evening of inspiration and as the idea was still unfolding, was to look for CB350 exhaust systems. I had no real picture in my head for a certain style of exhaust plumbing, but I knew it couldn’t be chrome and weedburner-aftermarket-bland. If I could find a decent looking set of pipes, I would initiate the project. If there were no good exhaust systems available, I wouldn’t even consider the build. I remembered the period megaphones on the factory CYB350 and the Yoshimura pipes from the ‘70s, but that’s about all I had to go on. I quickly stumbled across a photo of the red and silver ‘68 CB350 racer/café racer built by a high school class and it snatched me right out of my websearch-induced hypnosis. This exhaust system was too fine with its upswept megaphone/mufflers with more angular (as opposed to curved) head pipes. The ‘upswept’ captured my discriminating eye as much as anything. I began searching for the supplier, and found them in Houston (Jemco). Ironically, Jemco was founded in 1969. It was at this point I knew I could begin the task of collecting the parts to make this project a reality. But it would be many months before I needed the pipes, and I wanted to get my hands on them as soon as possible. I already had quite a stash of new and used parts to dig into from years of pack-ratting. And, not one to be unoriginal and copy-cat, I still wanted it to closely resemble the photo I found and saved.
One painful decision had to be made prior to committing to the 350 build. I had been saving a well-preserved and complete 1974 CR125M Elsinore for almost 20 years. (I also have a 1975 CR125M1.) It was my dream to put this historical, 1974 honey back to brand-new condition. I preferred a 1973 CR250M since I owned 2 brand new ones back in my early (and injury-prone for some reason) motocross career. But they had already gotten spendy, so the 125 was the next best thing. I can still recall, back in ’74 promoting races at memorable Bott’s Park. There were so many 125 Elsinores entered that we had to run heat races before the (3) motos. I had all kinds of NOS pieces and parts including a fuel tank, expansion chamber, shock absorbers, ignition system and carburetors. I had to make a choice; I needed cash flow. I cried, but I sold all my NOS Elsie stuff and sent my funds in a street bike direction. I still have both CRs. Maybe some day.
Café racers have always been special to me; I never cared for the ‘cruiser’ style and have always favored a more sporting ride and riding position. I had 2 CB400Fs and a 1981 CB400T equipped with low bars. I raced them all at the Austin Aqua Fest roadraces and recollect driving or riding to Austin on many occasions just to experience all the café racers on the streets and twisty, Hill Country back roads. There was a huge resurgence of interest in CB350s well before I started the project, both café racers and vintage road racers, so I figured I had better get moving on the build before parts became even more scarce and expensive. I discovered quite a variety of CB350 café racers while cruising the net. The majority of them were not all that inspiring; the tanks, seats and fairings just didn’t appeal to my tastes. And to make the craftsman in me squirm even more, the preponderance of the CB photos I scrutinized revealed workmanship and detail that were in a range from disappointing to disgusting, so I became even more inspired to build the ‘ultimate’ CB350.
I’m not crazy about copying someone else’s design/concept, but the inspirational bike, the one with the Jemco pipes, was the most desirable for several reasons. It retained the stock fuel tank and color scheme, a must, since I had to have the ‘60s-era tank knee pads. It had the best looking café seat/fender, and, those pipes. In order to make this design my own, I would have to alter it somehow. This would be easy though, I would simply add a front fender and a small quarter fairing. The hoard of Hondas I had been examining and evaluating during all my research were mostly sans front fender. Gotta keep the muck off the mug.
Immediately, I began my search for a donor and found a ’69 on craigslist in Waco. By the time I arrived with cash, the fuel tank had disappeared. Disappointed, I gathered up the engine, frame and wheels, and a box of rusty parts, and headed home, just $150 poorer. The fuel tank search continued for hours and days until I found a link to another craigslist posting near Buffalo, NY. The tank had been repainted, but had all the stock emblems. The seller told me it was clean and ready to bolt on. I bought the tank (he told me it was a bolt-on-and-ride but it was full of rust) and few other assorted parts, and was set to proceed. I did find a very effective tank rust remover (Evapo Rust) and the inside surfaces are now clean, shiny, rust-free metal.
September of 2010, and the project was on. I created a document (and boy am I glad I did) and started listing every part I already had and, eventually, listed every part I would need. Everything I ordered/received was entered into this ‘repair order,’ so I would always have a record of the cost and source for any future creations. In hindsight, and this project dragging on for years, I sure needed the documentation for all these hundreds of parts.
Café racers have a few essential components that must be correct: the front fender (yeah, the forgotten front fender); the café seat/rear fender; the handlebars; the fairing (if used); the rearsets; the exhaust system (must be loud). After another exhaustive and frustrating pursuit, the seat/fender (used on the Jemco bike) was located. If I couldn’t get this seat/fender, and those pipes, my project would be stalled, or would never commence. There is a plethora of seats to be had, but they just didn’t look right to me. I located the seat at Glass from the Past. The challenge no was to conjure up a way to get this ‘glass seat mounted at the original height and not just slapped onto the top of the frame as is so painfully common. And, I want to use the front seat latch and rear hinge to inject some unique originality. I wasn’t sure how I would attach the tail light or fit an inner rear fender, another commonly deleted or rejected, requisite chunk of essential bodywork. Gotta keep the filth off my fanny. The jettisoning of the aft fender also causes soiled air cleaners, frame tubes, seat pans, taillights, electrical tangle, batteries, engine parts. You get the point.
CB77-style, flat drag bars would be my choice of ‘steering pipe’ (Honda terminology); clubmans or clip-ons might be too low for comfort. I frequently drool over CB77s with the factory drag bars. I still have one remaining set of Nava Gran Turismo grips. I suppose I saved them for a reason. I have been using these for decades, and my 1983 VF750F and 1978 CX500 currently are ‘enhanced’ with these. And, they smell like a Fiat (I’ve owned and enjoyed several). But, I had no idea how to approach this front and rear fender quandary. All the fenders I found on line, just like the seats, didn’t appeal to me. What in the heck will I do out back. The chrome boat anchor of an original stays in the basket case. I began losing sleep over the fender dilemma.
I knew I would need decent forks, something functionally and cosmetically more up-to-date than the stock ones. I found a nearly new set of CJ360T forks on eBay for less than $50. I was tempted to do the early XL250 front end, but passed. I also bought a CB360 headlight bracket, fork bridge and steering stem. I didn’t want to use the universal, chrome (I am averse to chrome), clamp-on headlight brackets. The original fork covers (headlight mounting ‘ears,’ for you laypeople) were rubber-mounted for a reason: CB350 vibrations man. The bulk of these brackets appear to be no more than average quality and, they are just too mainstream for me unless they are painted or personalized. My front end was complete. Just by chance, I typed in “CJ360 front fender” one night on eBay. I remember these bikes from my days in the shop; I crashed one hard one day on a test ride. They had a handsome, plastic fender. When I saw 2 listed, I knew this was the fender to use, and ordered one. I didn’t want to pay the $80, but I had to have it. These are slim fenders, nicely shaped, with a partial metal brace/mounting bracket. I now had everything but the fairing.
All I could find were clunky fiberglass café fairings, expensive quarter fairings or Emgo Viper fairings, and the Viper seemed too big for the little 350. I located a quarter fairing on eBay that was painted to match a CBX. It looked smaller and narrower than the Viper. I ordered one, unpainted. It was a Viper. Dammit. The paint job and angle of the photo threw me off. I was stuck with it though and cut the lower corners and some of the sides off to reduce the Viper ‘look,’ frontal area and overall size. This’ll be an important mod though, it means my fairing will be unique, and not just another Viper fairing on another CB350. The supplied brackets and windscreen fasteners were crude. The fairing quality, surface, overall symmetry and windscreen fit are abysmal. I sourced and procured what I need to correct this. I paid $1.10 each for the black, flanged, nylock, 5 mm windscreen nuts after hours of searching. I found them at a hobby store - axle nuts for a gasoline-powered mini-truck.
The last piece of the café puzzle would be the rearsets. I must’ve looked at a hundred pictures of modified, custom, cobbled, aftermarket and homemade, ‘Frankensteined’ rearsets. They were all frustratingly ugly, expensive, poorly designed or poorly installed. This resulted in more searching and more sleepless nights. The rearsets had to be right; they would an important focal point of the bike, and they had to function properly. I couldn’t use a full set of modern rearsets, many just looked oversized and out of place, except for the Tarozzis. I did find a few forums mentioning CBR900 rearsets and found a pair from a 2001 CBR929RR on line for less than $100. The shift lever tab had to be relocated to the top, the shift rod lengthened with a new OEM part, and they worked out fine. I shortened the stock rear footpeg brackets about an inch, so they would be more rigid and clear the pipes. The rear brake was converted to cable-actuation adding a clever TIG-welded cable attachment to the pedal and fabbing a cable holder to the existing rear footpeg bracket. The 1968 factory, RSC CYB350 rear brake was cable operated. I eventually had to scrap the modified rear footpeg brackets because the pegs and shifter/brake pedal wouldn’t clear the mufflers. I had to start from scratch, but I had a spare pair of brackets. The mounting holes were raised about 30 millimeters and the CBR footpeg bracket mounting points were improved. I had to fabricate the ‘extra height’ using 3/16 plate and the ‘improvement’ required precise d-shaped holes in the 3/16 metal. This took hours. With the extra height came more leverage on the assemblies so the upper 6mm mounting bolt was changed to 8mm which meant adding extra thickness to the frame where everything attached.
My 41-year-old frame came from Waco, but by way of Minnesota. The lower frame tubes were split in 3 places from standing/freezing water. I planned to cut the damaged sections out and weld in new tubing. (The factory used 1-inch tubing, so this makes it easy to find the correct steel.) The frame looked good otherwise until I did an alignment check and discovered the frame was junk. I eBayed another ‘68/’69 frame and had it shipped by bus from Green Bay, hoping it wasn’t also split. It came with issues from poor packaging and years of pitiful owner/rider maintenance and neglect and required extensive repairs. I originally intended to install new upper muffler mounts in the rear section of the frame using 8 mm collars and heavy rubber grommets from a Honda BF90 outboard engine. This would’ve required adding large flat washers inside the frame rail just aft of the upper shock mounts to thicken and reinforce the sheet metal. The mufflers must be rubber mounted to prevent cracking. (The supplied Jemco muffler brackets fit on the upper shock mounts and look clunky to me even though they are structurally sound.) This design was scrapped in favor of lower muffler mounts after I realized the original bracket idea would interfere with rear number plates. (More on number plates later.)
I purchased Progressive Suspension 12-series rear shocks with 75-120 springs. The manufacturer claims these shocks are a half-inch longer than stock. They are actually 5/8 of an inch longer. The CJ360 forks are a half-inch longer, so the frame geometry will not be affected much. Akront-style flanged aluminum rims are a must-have. I found new Excel rims for $400 a pair, but they were on indefinite backorder at the time, causing more searching and hoping. I did manage to locate and procure a set of Akront/Morads from Spain through a fine supplier in California, Speed and Sport. This ensures period authenticity, so my initial Excel disappointment turned out to be a blessing. I had full sets of NOS spokes and intended to wrap the wrims in AVON AM26 tires (90/90-18 front and 100/90-18 rear). The front rim is a 1.85, the rear, a 2.15. (An exhaustive, global search for a 3.60-18 Dunlop K81 ended in disappointment. I wanted to do K81s on both ends.) Most of the bikes I’ve come across are fitted with oversize tires. This looks extremely funky and out-of-place and changes the geometry, so the 90s and 100s are the only way to go unless you do 100/80 and 110/80 rubber to increase width and maintain the same diameter as the 90/90 and 100/90.
The Waco purchase did not include a swingarm. I turned, once again, to eBay, and found one in Arizona. It arrived as described, barely any surface rust with tight bushings and chain guard tabs intact. I am designing and building a groovy (yeah, ‘60s lingo) aluminum chain guard, so I needed the tabs. Along the same deficiencies I have been mentioning, most of the stuff out there is built with no chain guard. Gotta keep the chain spooge off the slacks. I also latched onto a good, stock seat latch from the same outfit but eventually procured a shiny new one from Northeast Vintage Cycle.
To maintain the vintage look, I retained the front drum brake. This is tough for me since I don’t use the rear brake much on the street and rely on a 2-fingered, powerful front disc. But the compromise is a must. I did find some NOS Ferodo brake shoes ($40), so maybe the thing will stop reasonably well. The drum/hub was vented using my own, original design; not the typical holes bored. The slots are backed up, in a workmanlike manner, with #8 stainless wire mesh. This decision was made way before I decided to race the (vintage) 350 Sportsman class in AHRMA. A front drum brake is required.
The final drive was converted to 520 chain using a 17T countershaft sprocket (stock is 16) and an aluminum rear sprocket (36T, stock). This combination results in a very appealing ‘prime number factor’ which extends chain and sprocket life significantly. The gearing will be the same as a CB360 and with the extra displacement and lighter weight the bike will theoretically find its way to 105 MPH. It hit 10,500 on the front straight at NOLA. I shoved all the numbers into a computer program when I returned home. 10,500 = 110 MPH!
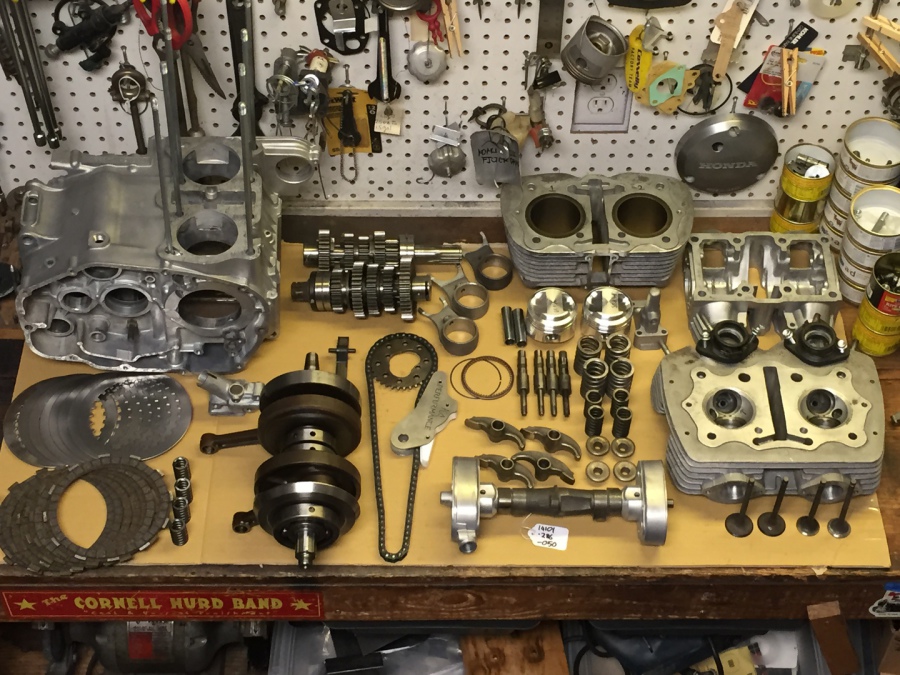
Engine teardown was as sickening, as I knew it would be. The spark plug threads were stripped (B8HS plugs and a cheater bar) and many of the steel parts in the bottom end were covered in heavy surface rust. The cam was usable, but 3 of the rocker arms were junk. This is a Type-1 engine (10,500 RPM) and a healthy valve train is essential. I located another low-mileage cylinder head and a 1900-mile tranny, complete. I sourced a set of NOS rocker arms and valves. I almost went the skinny valve stem conversion route, but I didn’t intend to race it at the time, so I didn’t spend the bucks. New cylinder head side covers (cam bushings) were a must-have. I already had the right one, considerably more expensive than the left. The clutch plates and disks are garbage (another hundred), and I thought the crank was okay. I bought another CL350K2 bottom end, cylinder and head for $50 just in case I need more parts. All 3 shift forks were bad though. More $$$! I placed an order through Honda for the cam bushing and shift forks and we had them! The K2 motor and junk frame became valuable test mules for fitting everything together.
Now, I just needed the cam (I decided I had to have a new cam to go with the new rocker arms). I searched for a new camshaft for several weeks, contacting 30 or 40 dealers, including all the Honda dealers still in business (through buyouts) from the early ‘60s. One day, out of desperation, I typed in 14101-286-050, again. I kept searching through page after page of websites until I found a long list of vintage parts. A link click took me to Dave Mungenast’s Museum website and several other links, but no way to determine how to contact someone regarding the long list of parts, which included the cam and other items I needed. I persisted, and found the parts source: Northeast Vintage Cycle in Springville, New York (same town the fuel tank came from). They had the cam and 2 rockers for $250, and several other parts I had been unable to find. In fact, I eventually placed numerous orders with these guys, and they always came through on the part and the price. The last puzzle pieces fell into place. That same day, a guy in New Zealand answered my e-mail regarding a 050 cam. He also had one in stock, for $250, shipped, and a warning to use only the ‘286’ rocker arms (yeah, I know all about the rocker arm fitment). How weird, finding 2 in one day after nearly abandoning the 2-month-long search. Well, the puzzle wasn’t quite complete after all. I couldn’t wait to get home from a business trip in blizzard-stricken Oklahoma to open the box containing the elusive cam. Always the skeptic, I told my wife, Sheri, I would believe I actually owned this proper, ‘fat’ cam when I held it in my hand. They shipped the wrong bumpstick. It turned out to be the later-style cam. I e-Mailed Malcolm in New Zealand and told him what happened. He wrote back telling me he had 2 cams, but... A dozen photos of his 2 cams were sent. One had some corrosion, the other looked like it had been in an engine for just a few revolutions (maybe long enough to figure out it wouldn’t work with “312” rockers?). I selected the latter, for $260 NZD ($201 USD) including shipping. (I’m now beginning to think I should have used my existing cam.) But wait, the cam nightmare did not end here. Shipping materials are in short supply over in New Z. The cam made the long trip in a plastic bag and was making a tinkling noise when I popped it out of the mailbox. I knew at that moment that I owned a 2-piece Type-1 camshaft. One of two known to exist on the planet, and converted by carelessness to scrap? Malcolm got an e-mail-full. In no time, I received the other cam, in a correct shipping container, no-charge.
I unpacked the eBay cylinder head, also shipped from New York. I was nervous. There are far too many things that can relegate a cylinder head to paperweight status. The spark plug threads looked perfect. No bent or broken fins. All the gasket surfaces were near-virgin (my biggest fear because of all the bozos out there using rotary Scotchbrite pads to remove gaskets from aluminum surfaces). There were no floppy cam chain abrasions. (Engines are often run to death with loose cam chains and this devours several key internal surfaces.) The exhaust studs still retained most of their factory finish. I am pinching myself at this point, in awe of the condition of the part, so far. Moving on, I noticed no one had been in the ports hogging out metal. This was yet another big relief. Now it was time to remove the valves to check the all-important seats and guides. Worst case, the seats have been cut too deeply into the head which would turn it into a doorstop. The guides are replaceable. Another astonishing discovery: the guides are as tight as new. After decarbonizing the seats, they also appeared as new; although very narrow (less than the minimum 1 mm). I cleaned the exhaust valve faces. They looked perfect. So, as it turns out, this cylinder head could be the most well-preserved, used example on the mother earth. I had my choice of at least 20 on eBay and, apparently, found the best one. The outer valve springs were just 0.20 mm above the service limit. I had one new one already, and we had 10 in stock, so a set of 4 were installed. My top end’s dang near brand new. Giddy over the head, I grabbed my new intake manifolds, bolted them in place and began cleaning and matching the ports. 3 hours later, I have the perfect cylinder head. I dressed the valve seats (to perfection), my favorite engine building procedure, with my nifty, period correct Honda valve seat grinding tool. I’ll have over $700 in the head and valvetrain alone, but, as we all know, this is where the HP, low noise and reliability reside. I really wanted the 5.5mm valve upgrade (stock valves have fat, 7mm stems and are heavy). But I never considered racing this thing seriously, so the $600 I would cough up for the valves, springs and ti retainers stayed in my pocket.
The pistons created yet another challenge. I wanted to find a new old stock, 3 mm oversize Rocky piston kit. I remember them from the old days; they had cast ART pistons. This would bump displacement from 325 to 357. I had to have more cubic inches because I will be installing 28 mm, round slide carburetors, and snappy throttle response is vital. I was mighty excited to actually find the kit. I ordered it, but the old-design pistons were extremely heavy and just wouldn’t be good for the rods at 10,500 RPM. Back to square one. All the 67.5 mm pistons available for CB350s are 12.5:1 racing slugs. Bore Tech sells 65.5 mm cast pistons, but I wanted 66 or 67 mm. I need 10:1 pistons for street use. More research turned up the possibility of using oversize XR200 pistons, but the deck height is 2 mm taller than the 350 piston, so they will not work. I kept digging for info, refusing to abandon my last hunch. I discovered ATC200 pistons have a 1 mm shorter deck height than the XR, and the 12:1 Wiseco offerings have a very thick upper ring land and plenty of dome. I planned to build a jig to rotate the piston and cut the edges of the crowns down to fit. By ccing the piston dome and combustion chamber, I would be able to get the compression ratio where I needed it. I sure wanted cast pistons (I’ve never been a forged/Wiseco fan), but I thought these might work, and hopefully be lighter than those heavy Rocky pistons. I always set my Honda engines up at 0.03 mm piston clearance. I should be able to set the Wiseco clearance at 0.04 for a good compromise (they recommend 0.05), but careful break-in will be required. I then decided to go 66 mm on the bore. The cylinder liners are just 70 mm at the bottom. This would leave only 1.50 mm of wall thickness after the 67 mm bore job. 66 mm gives me 346 cc, and an extra 0.50 of liner, so this is an appropriate compromise. But, after taking delivery of and measuring the $200 ATC pistons, I determined they would not be tall enough. After many months of waiting and researching, and trying GPZ750 pistons (not enough compression), THR released their 66 mm, 11.2:1 forged pistons. Sometimes prayer does help. With a composite gasket and more, careful ccing, I found these to be right at 10.1:1 and not the advertised 11.2. Disappointing.
With the piston predicament now in my rear view mirror, I scraped up enough cash to get my pipes ordered. I had already visited Jemco, and met Dan, the welder. When I first walked into the place, it reminded me of motorcycle shops back in the ‘70s, except here were exhaust pipes, parts, cones, and bikes in various stages of system development and installation everywhere. Dan’s a throwback guy, motorcycle freak from the old days, and a good welder. He showed me a set of CB350 pipes, we struck up a good relationship, and I couldn’t wait to get a set of my own.
Most of the racing CB350s I have seen use Mikuni VM30, 32 or 34 carburetors. Being a long-time Honda freak, I wanted to use Keihins, and not copy all the other Mikuni-equipped bikes (another chance to be unique). Forums and my own experience revealed more Mikuni problems as well. Many Mikuni conversion kits use primary-type needle jets instead of emulsion tubes. These do not work on 4-stroke engines, but I did find a source for Mikuni VM emulsion tubes. I found several overseas sources for Keihin PE28 carbs (more hours of research) used for the 124 cc, big head motors popular in pit bikes. There are 2 versions of the PE28 though, one for 80 cc 2-strokes and one for the 4-stroke pit bikes. These carbs have large diameter air horns/inlets similar to the Mikunis. In fact, the air horns are cleaner than a Mikuni and should flow better at high RPM. They look good (clean, vintage appearance) too. They come with cable-operated enrichment valves. Additional research pointed me to more Honda-specific parts, and a VT600C 1-into-2 choke cable looked like it would work perfectly. The choke knob will reside under the right side of the seat (unique once again). This cable has one very long side and will have to be modified (looks like trouble). I ordered a CB200T throttle cable. I later discovered there are 2 different part numbers for this cable, one is gray (405) and one black. Well, now all the cables will be black. NOS SL350K1 throttle cables (gray) are expensive, if you can find one. I modified the carb tops; they came without the 6.0 X 0.75 threads and the required cable adjusters. NEVC supplied the adjusters and I machined the tops to accept them and the correct cable boots. I had to cut and modify the throttle and choke cables, but this used to be commonplace back in the day; I do possess the knowledge and tools. I ordered some 50/50 solder and a soldering pot. Just use plenty of flux. The front brake cable and clutch cable fit the drag bar location perfectly. There will be no typical-for-most-modified-cb350s cables misrouted and hangin’ out where they ain’t supposed to be. The NOS, Honda XR250R rear brake cable is black. Again, it will be attached to the brake pedal with a (TIG-welded to the CBR brake pedal) adapter carved from a new front brake lever.
I was mighty excited when the Keihins arrived. I was mighty sickened when I checked ‘em out. They were poorly manufactured junk, full of metal shavings. The top threads were rough and, as mentioned before, there were no cable adjusters in the tops (how will I be able to synch them?). The jets have no markings, no way to tell what size they are without using my needle drill bits. Yuk. They will work; they needed to be rejetted anyway. They only cost me $60 each, including the shipping. I suppose I got what I paid for. They are actually 28.5 mm bores and I planned to bore them out to 29 or 30 mm. The smoothbores used on the Yoshimura and CYB350 engines were 31 mm. When I finally got around to the carb boring experiment, I realized there was not enough meat in the bottom of the venture to enlarge them. 28.5 it is.
The CB360 provided more upgrade parts in the electrical system. I’m using an NOS CB360 main wire harness, heavily modified. Many of the wires in this harness are unnecessary, but all the color codes are proper. I’m using a modern rectifier/regulator that connects directly to the stator and battery. A CB350 headlight and headlight case were located, the case and a few other essentials donated by Ronnie Lunsford at Northwest Honda in Houston. They sure look much better than the stock clunky metal case. I located some black, cat-eye, mini turn signals with standard 23 watt bulbs which will make the flasher work properly. The signals are mounted in new brackets welded to the CB360 headlight mount (major design and fab hassle) and work seamlessly with my tailor-made, aluminum fairing brackets. The rear ‘winkers’ (correct Honda terminology) fit perfectly, with hand-honed collars, in the NOS grommets (more NEVC stuff) that were originally there for rear fender mounting. So integrated, it hurts. I wanted to incorporate surface-mount LED turn signals, but compatibility issues, price and size/fitment turned me away. The mini signals will provide proper function and a more period look. I did find an LED taillight that tucks exquisitely up underneath the rear fender. It’s a license plate eliminator kit for late model crotch rockets. I fabricated a clever, functional and attractive aluminum seat base and integrated license plate bracket which work harmoniously with the seat hinge and latch. I installed stainless t-nuts/weld nuts through the top of the fiberglass seat pan with epoxy. They protrude out the bottom by 3mm, and this provides a dowel pin function to keep the seat located and fixed onto the seat pan. The After losing (actually, giving up when the price zoomed north of $150) several eBay auctions for a new, unused, 1969 Texas license plate, I lucked out during another exhaustive internet search and found one for $20.
I already had black, NOS 1974 XL250 handlebar switches to use, but they were both functionally incorrect so new switches were ordered (ouch). The controls have to be cosmetically perfect. The drag bars were to be drilled and modified to run the wires internally, cleaning up the look. These bars were scrapped in favor of clip-ons for racing. I’m converting many of the old-style wire harness connectors to modern Sumitomo connectors, mounted on custom-made stainless steel brackets. The entire harness was stripped, gutted, revised and correctly re-wrapped to align impeccably with each component. The fuse holder is a modern, Honda-sourced part from the same outboard engine that donated the rear muffler mount grommets. An obligatory Battery Tender 2-pin connector has also been carefully integrated into the wire harness and lives on another handy, Joe-built bracket. The electric starter’s been tossed to reduce weight. I found a CB360 kick start lever. It pivots at the base instead of at the top and looks way better than the original. The eBay part I received barely had any surface rust and the rubber was perfect. It functions perfectly and I can make it look brand new.
I was lucky enough to acquire a nice set of gauges from a 1970, Type-1 model with the 10,500 tachometer redline. I restored each instrument’s light harness and installed new faces with fresh mounting cushions. The instrument harness mounting bracket had to be created from a large plate of aluminum and work with the fairing, headlight and mounting bracket. More careful, time-consuming integration. I eventually eBayed a brand new speedo, with a slight scratch in the lens, for $99. NOS speedos normally sell for well over $300.
To accent all the other brushed (1000 grit) aluminum trinkets adorning my CB, I created a trick, aluminum battery box fitted to a Yuasa YTX5BL-S battery. It’s TIG-welded and serves as a centerpiece, if you will, for the void ahead of the rear fender. Travis was kind enough to do all my tiggin’ when we were out in California in the spring of ’14. It’s designed to intersect the aluminum rectifier mount plate which doubles as the upper rear fender attachment. The rear fender is craftily mounted, Honda-style, using OEM grommets and collars. I used a universal dirt bike rear fender. With careful snipping, and a heat gun, I was able to shape it and trim it to fit perfectly inside the frame, above the chain guard, and almost protect the entire rear of the seat pan and license plate bracket. New brackets (with 6mm threads) were welded to the frame for the lower fender mounts.
In that same area, I have welded a threaded boss between the K&N filters. In fact, in line with Honda design and execution, many of the areas where a nut and bolt would be used now have nuts welded into place to eliminate the nut and simplify bolt removal and installation. The rear of the filters are attached to this boss (more custom aluminum stuff) so the carbs are firmly supported.
Before I finished the frame mods, I realized I needed a steering damper, so an 8mm boss was welded in place for the damper mounting bracket. The original Honda design incorporated one, albeit crude, and if I visit a racetrack it will be a good idea. Tankslappers just take the fun out of riding. I ordered a Japanese Shindy, and found the quality exceeded my expectations, except for the body mount heim joint, which flopped and rattled extensively. 2 strategically-placed o-rings fit perfectly on either side of this heim joint and removed the slop without restricting movement. It occupies the same space as the tachometer cable and horn so guides were added for the tachometer cable and clutch cable and the horn was moved to the left side just ahead of the ignition switch which is mounted in an NOS, SL350K0 bracket (NEVC to the rescue, once again).
If I’ve learned anything in 40-plus years of fondling Honda products, I have come to appreciate (obsessing over?) all the clips, guides, brackets, clamps, holders and assorted wire and tubing organizers and securing devices. My project is graced with these little ‘helpers.’ No all-too-common, rats-nest wiring on this scoot. “Every tube, hose and wire harness shall be assisted.”
All the fasteners have been upgraded to more modern flange bolts and nuts eliminating the original flat washers and lock washers. Every bolt or screw is the proper length. The case screws are all new, original the Phillips-head. I never liked or ever used the socket head screw conversions. It takes special skill and care to remove and replace the standard, period-correct screws, so I prefer to do it old-school, the way Mr. Honda intended it to be. Once again, in my exhaustive research of myriad CB350s, I noticed an abundance of builds utilizing hardware store fasteners which are unacceptable to me. Many of these builds also incorporate bolts that are too long, and this looks unsightly. Honda bolts, washers and nuts are such high-quality pieces and using generic stuff makes no sense. I also see many ‘mechanic 101’ rules broken on these projects such as using a non-flange bolt or nut against an aluminum or a painted surface, with no flat washer. Standard Honda dish-head bolts are used in many places on this build. Black mini mirrors will compliment the fairing and drag bars.
I added up the collective weight of the stock pieces I chunked or replaced with lightweight components. I figured I reduced the overall weight of the CB350 by over 65 pounds! It started out at 358, so the final dry weight should be about 295 pounds. Pretty light for a modern street bike; even more impressive for an old mount. My target was just under 300.
The last piece I coveted was a trick electronic ignition system to replace the contact points. There are several to choose from these days, even one from Vietnam, but the little gem I prefered, from Charlie’s Place, even uses a stock-looking wire sheath. I am a master points-setter, so keeping the points happy was never a concern. But I just needed this available, modern spark switcher. Right before I finished the frame, I switched gears on the ignition system. I researched them all, and found the Probe Engineering system. It was $400, so I scratched it off my want list. But this has a starting RPM retard and the idle RPM timing can also be altered. I’ll be running more degrees at full advances, and with this system I’ll be able to retard the idle advance back to normal, and the kickstarter gears will thank me. This system has a small ICM. All my component brackets and wiring harnesses were located and built, so now where will I hide the ICM and the 2 harnesses? I labored over this for 2 weeks, and almost welded a new bracket to mount the ICM until I stared at it just long enough one day. (All the welding had to be completed before sending the frame to the powdercoat shop.) The ICM is the same width as the battery, slightly shorter, and 20mm tall. It will fit perfectly on top of the battery, which sits in a (modern) Honda CB250 plastic battery cushion/box. With a shortened one of these serving as an ICM cover, the ICM will disappear with only the 2 harnesses poking through the front of the cover and disappearing into the frame. 2 holes were drilled for the harnesses in the frame backbone, one right above and behind the ignition coils, and one near the cylinder head for the pick-up plate wires. Seamless.
About 2 years into the project, I took my frame with engine and rearsets in on Monday of a Houston-area business trip, and Dan had me loading up my new system on Friday. A communication snafu resulted in me getting the roadrace version of the exhaust and not the quieter, smaller diameter café version. I took it all back to my shop and eventually fit everything on the bike. It did not fit; the mufflers hit the rearset brackets. Back at Jemco, Dan gave me some pipe sections and told me to cut it up and weld it back together with less upsweep. Not what I wanted to hear, but I can do this. After sleeping on this for a month, I decided not to use the system; I didn’t mind the extra noise, but primarily, I didn’t like the headpipe diameter. These headpipes are 4mm too large (inside diameter) for a stock motor, and exhaust gas velocity would suffer. This large diameter pipe issue had me uneasy since the day I picked the pipes up, and just got worse as time went by.
2 months later I’m back at Jemco to speak with John about exchanging the system. I told him I reluctantly accepted delivery of the system but it wasn't what I ordered since it would be used on the street and not the track. The noise level and port velocity (1 1/2-inch diameter head pipes) were a concern. The system did not fit my bike either, and this was after I had taken him the frame with engine and rearsets so he could make sure it fit. When I told John I wanted to exchange the 'roadrace' system for the smaller diameter 'cafe' system (per the pictures on his website and other photos I have seen of the 'cafe' system) he just looked at me somewhat incredulous, scoffed and laughed, and stared at the floor. He kept doing this and saying, "I don't know what to tell you." He said he does not have a smaller diameter system, and also declared, "The exhaust needs to get out." This after I told him the pipe diameter was a poor match for the engine displacement and port size and asked him to explain the photo of the small-diameter system on his website. He continued to laugh, scoff and look at the floor, and his body language suggested, "Just leave me alone." I told him what I thought, left the building and slammed the door. The guy was a genuine jerk.
So, 28 months after starting this project – one that began with such joy over an exhaust system - I had no exhaust system. I’d sooner crush it than ever install it on my bike. Can’t finish the project, but I figured I’d sell it without a system and the new owner could do whatever he wanted with it. I was done. This was January of 2013 and as the year progressed, I completely lost interest in the build.
But in March of 2014, one of my ridin’ buddies, Mark Smith, called and invited me to join them at Barber in October. He had also invited me in October of 2013, and I declined. But this year was different. A trip to the Vintage Festival and museum, were now on my Bucket List. And then my Bucket List took on a new twist. “If I’m goin’ all the way to Barber, I need to enter a race.” As the 350 build languished, I started thinking about racing it, just to improve its pedigree. I never let that desire wane.
Well, I had always been fascinated with the CB160 racing craze up in the northwest and never could get the urge to build and race one of these bikes out of my system. I worked on so many of these back in the ‘70s, and 160s carved out a place in my heart as a result. I immediately began researching 160 racing and searching for a 1968 CL175 to base a racer on. I found one, and Sheri and I drove to California to pick it up. A new build was on, further relinquishing the 350 build. I worked feverishly on this bike, and then, in the fall of 2014, I realized time and dinero were my enemies. The mods, and the cost of those mods, were straining me financially. No way could I get this 175 ready in time for the qualifying race at NOLA in March of 2015. (Barber can’t be your first race.) This realization breathed new life into the 350. And now, the build’s focus was not just ‘finish,’ but rerouted to race-ready. At this point, it’s November, and I had 4 months to get the thing rolling, tested, and ready to race. After NOLA, I could re-concentrate on the 175, and maybe race both bikes at Barber. I just gave in, and used the formerly rejected exhaust system. Eventually, the head pipes will be replaced with ones that are the correct ID.
First things first, I had to get the frame finished and off to the powdercoat shop. A look through the rulebook, and now I need racing rubber and a belly pan. Air-Tech Streamling was the source for a small, fiberglass, rectangular pan which meant more frame mods (I’m glad the frame wasn’t already powdercoated). A threaded bracket was added under the lower frame crossmember for the rear belly pan mount. The front belly pan mounts were attached to the front, lower engine mounting bolts. I used 1/8-inch thick, 2X3, 6061 aluminum square tubing for 90 degree brackets. It takes some time and patience, but cutting brackets from this tubing eliminates bending flat plate/strap for angled brackets. The 3 belly pan brackets (2 in front, 1 in the rear) were drilled to 14mm for installation of rubber grommets. The grommets dampen any vibrations that may cause the fiberglass to crack, and they just look much cleaner than the more common and convenient strap clamps. And I can’t even entertain the thought of clamping something around the freshly powdercoated frame tubes. I’m not sure how much vibration this bike will have, but I know how they buzzed back in 1970. I also spent some time designing some nice number plate bracketry, and this is when I realized the muffler brackets, formerly intended to go behind the shocks, had to be switched to attachment below the rearset brackets. Hours of searching turned up ATC250R muffler mounts: heavy duty, with rubber bushings. The drag bars had to go too, but I didn’t know if I’d do clip-ons or clubman bars at that time. I also needed a paddock stand so spool brackets were welded to the bottom of the swingarm. Oh yeah, I decided I needed a damned roller started, so there was another week spent researching and trying to design one of these around a Honda GC160, general-purpose engine. That’s a whole ‘nother story.
It took the week between Christmas and New Year’s Day to get about half way through the frame cutting, grinding, filing, welding and modifying. My welding gas regulator took a dump, emptying my welding gas bottle. Cost me $180, and 3 lost days getting that fixed. Once all the welding and filing was completed, I had to strip as much of the paint off to inspect for other damage that could be visible under the powdercoating. It took several hours to find all the imperfections, file them, 150 grit them, 400 grit them. And then I had to 400 grit all the areas that would be extra conspicuous to the onlooker/observer. I added a cross brace under the seat, between the upper frame rails and ahead of the upper shock mounts. I opted to forego the popular braces between the lower frame backbone and the rear frame tubes. This installation interfered with my crankcase breather catch tank location. I spent many hours sourcing the catch tank and designing a rubber-mounted bracket. I couldn’t bring myself to toss the design and start over. This bike was to be primarily used as a street-legal café racer. Only racing it once or twice, and probably not pushing it to the limits, I decided the additional bracing wasn’t necessary. I had to cut the center stand brackets off the old frame and weld them to the new frame using a clever jig I designed to hold them aligned and in place. I also had to come up with a method to hold the rear fender brackets in place while I welded them. The steering stops on the front of the frame had to be widened by 3mm on either side. I OCD’d (again) and created this diagram listing all the different operations the frame would require. My brain is old and anal and worn out and stressed about the hows, and I just need these aids to keep my thoughts from overwhelming me.
There were many garfs on this 45-year-old frame. Someone had replaced the original footpeg bar mounting bolts with longer ones, and as they were tightened into their bosses they created large dimples in the frame tubes. One bolt actually punched a hole in the tube. These bosses were removed since the footpegs are now rearset and I won’t be using a side stand. The center stand stop area under the frame was also badly dimpled and had to be repaired. I decided to add a small threaded bracket under the steering head for an oil cooler, just in case I need one in the future. All 6 of the engine mounting tabs were deformed from loose bolts and lockwashers without flat washers. I had to create a small jig to flatten the tabs and also filed the burrs left from the lockwashers. Crossbracing/boxing was added inside the lower downtube between the swingarm pivot tube and the lower frame crossmember using 3/16-inch plate. An additional bracket was welded in place just behind the rear fuel tank mounting area to support the custom, aluminum seat base the fiberglass seat pan mounts to. The stamped seams were welded, but not from one end to the other. I’ve seen this performed on many builds, it’s just not necessary, and it creates too much heat and distortion. My welds are about 40mm long, spaced approximately 100mm apart. This early frame had no steering head gussets from the factory. I was able to remove the upper gusset from the junk frame and weld it in place on the good frame. I punted on the 2 lower gussets; they were too much of a bitch to remove. The frame mods probably consumed the better part of 2 weeks. I also had to check the frame and swingarm alignment, and some tweakin’ ensued to get the rear to follow the front and both wheels plumb with each other.
I ordered a mess of metal from onlinemetals.com for brackets and a bunch of other ‘stuff’ from my favorite supplier of other ‘stuff,’ McMaster-Carr. A Moto-D safety wire jig was procured. Research on paddock stands resulted in the decision to design and build my own, but eventually tossed the idea and picked one up at Harbor Freight, a place I’m embarrassed to be seen in. It failed. They are junk. Speed and Sport had the yellow number plates I needed. A custom wire harness was fabricated to support only a kill switch, neutral light and ignition power. It will integrate nicely with the 2 custom battery leads (- and +) I’ve already constructed for the street wiring harness. I used only 2/3rds of the stator since it will be powering just the ignition system. The neutral light’s in the original tachometer. I incorporated a crafty aluminum standoff to mount on top of the neutral switch stator to accommodate a clutch rod seal holder retaining plate using the 6mm neutral switch stator mounting hole.
The one-piece front number plate bracket design/drawing didn’t work out, but a 3-piece replacement was created. It’s a work of art and also serves as a mount for the tachometer. The rear brackets are also be quite functional, stout and attractive. I’ve studied front number plate brackets extensively, and I had to utilize something different and extraordinary. I sourced 5mm, aluminum, flanged locknuts for plate attachment and fabbed some 18mm OD aluminum fender washers for the 5mm pan head attaching screws. It looks pretty clean and suitably trick. I fabricated all the aluminum fender washers used on this build. There is no source for these except for ¼-inch ID, and this results in a loose fit and an unacceptable, non-symmetrical appearance.
I dropped the frame and swingarm off at the powdercoaters in Houston on January 21st. It should’ve been ready in a week. The deadline was fast approaching and I was getting nervous. At that time, I still hadn’t found anyone locally to bore my cylinders and I didn’t have an oxy/acetylene set-up for the exhaust system work. I needed to rebuild the forks and modify the throttle and choke cables. The engine was in a thousand pieces but the assembly would (hopefully) be the fun and low-stress part of the final steps. The paint booth wasn’t built and the mangled fuel tank would require hours of dent repair. The rear hub was not yet drilled, screened and laced. The belly pan brackets were still an idea and that’s just an incomplete list of all the other crap that had to be done.
There were delays at the powdercoater shop and I didn’t pick the frame up until February 25th. The boss sent an e-mail the week before informing me of a national meeting the week of March 23rd. Now, I have 3 weeks to finish this bike, and I was in deep doo-doo. I told my wife I would be devoting all of my time to finishing the build, and she understood. I worked every night until 3, 4 or 5 in the morning for 3 straight weeks. I nearly lost it several times due to the many ‘set-backs’ I encountered: missing parts; incorrect parts; fatigue; trips back and forth to the metal shop; 2-hour procedures that turned into 6-hour procedures.
I had to order new leathers; my vintage, 1983, Team Honda, Steve Wise hand-me-downs fit my butt, but they refused to fit the rest of me. The used leathers arrived, and I dropped everything to try them on. 2 hours later, I discovered I had been bitten by a bad spider and part of my left hand was rotting right in front of me. I sure didn’t need a medical set-back.
I somehow overlooked ordering enough swingarm bushings, seals and collars. An emergency eBay cruise turned up 2 NOS collars and McMaster Carr supplied the bronze bushings. But the flanges were too narrow so I needed 4 0.90mm shims. Back at the metal shop, I found an old bent and cracked aluminum go-kart chain guard. The calipers confirmed the thickness at 0.90. My lucky night. 4 hours later, and 2 special tools later, I had my $2.64 (each) swingarm bushings perfectly installed.
The rear wheel was laced without vent holes/screens. I figured the rear brake would be used sparingly on the track and heat would not be a problem. The problem turned out to be rear sprocket spacing. Converting to a 520 chain fouled up the rear sprocket alignment. I fabricated an eighth-inch thick washer that fit between the hub surface and the sprocket. It took a couple of hours to make it, but it fit perfectly and solved the problem.
And then my bead blaster quit working. 2 days later the 24 tooth-per-inch band saw blade snapped. I live out in the sticks, so jumping in the car and driving to the hardware store is a 1.5-hour affair. 3 stores later, I found the blade I needed. My son eventually showed up with his oxy-acetylene bottles, but I had no brazing tip. It took 2 weeks to hunt one down. The oxygen regulator blew up the first time I tried to use the torch. Too many set-backs.
It took me 2 ½ days obsessing over and finishing the number plate brackets, and with 10 days to go, things were looking bleak. I haven’t pre-registered for the NOLA race yet (March 20th deadline); I’m waiting to get the engine assembled and running before I commit. It’s now March 14th, and I have a steep wall to climb.
Once I get the bead blaster working again, I’m able to blast all the engine parts. That’s when one of my biggest set-backs occurred: I can’t get the blast media grit out of the crankcases and crankcase covers. Just one spec of that junk would destroy the engine. The blast media embeds itself into the aluminum and cuts the steel parts like a machine shop. I spent the better part of 2 days cleaning these parts (oil passages, threads, and everything else). I now know how to prevent this.
I had to check the near-complete valve seats for final fit. The exhaust valves were not seating in the center of the exhaust valve face. This setback cost me a half day and I could never get the seat to move very far in 3 attempts. It wasn’t critical, but it wasn’t perfect either, and I’m all about perfect valve seats. The cylinders were honed with 220-grit stones; the clearance for the forged slugs set at 0.07mm. Cylinder honing isn’t difficult, but this process turned out to be another obstacle in the build. I trusted Restoration Cycles, in Austin, TX, to bore my cylinders. They tried to charge me $170 – after a much lower and reasonable quote. We settled the dispute properly. I asked for a bore diameter of 0.03mm over piston size so I could hone the bare minimum to achieve the proper clearance. The holes were bored too small. One was at piston size and the other 0.02mm under piston size. Honing more than 0.03mm causes out-of-round and taper problems unless you are using a honing machine. I use either an Ammco or Sunnen portable.
The upgraded cam chain tensioner fit the cylinder perfectly so I didn’t even consider any possible interference with the cylinder head. It didn’t fit, and I had the head all assembled and ready to go on next. It came back apart and I spent an hour on the back stoop with my Foredom, hacking out a little clearance for the top of the tensioner.
The engine assembly progressed smoothly until I discovered too much axial clearance on 5th gear. There was no shim on either of the trannies that I had and the parts and shop manuals both listed one for all years. I had to fabricate a shim, and that took a long time. Just one more set-back. Once the engine was assembled, I had Joe (my son) come over and install it in the frame with ample padding to protect the beautiful powder.
I made a ring compressor out of a piece of sheet aluminum and a long zip tie. The engine was preassembled to check for proper fit of everything and also verify the cam timing which was near dead on. All the gaskets were carefully coated with a super-fine layer of Hondabond HT and everything torqued to spec before the sealer had time to set up. All the top end fasteners are new as are the valve adjustment caps.
I had to test-fit the front belly pan brackets and make the rear bracket using the bare crankcases before I assembled the engine. The pan was cut and shaped, and the front brackets fabbed and test-fit with the frame upside-down, so I needed to make sure everything worked with the engine hanging in its proper location.
Once the engine was installed, I assembled the stator/rotor and the clutch/oil pump. These were left off the engine to lighten and narrow it for easier installation. I used a later model, large diameter oil pump, NOS Honda clutch discs, plates and springs. It’s March 17th, only 5 days until I fly to Atlanta.
I used my old frame and ‘mule’ engine to locate the saddles for the megaphones. They were cut from 16 gauge sheet metal, and then bent over the megaphones to create a perfect fit, where they needed to be welded. I used large hose clamps to hold the saddles and brackets in place on the mounts on the actual bike, and then took them to the metal shop where I gas welded the saddles and MIG welded the brackets. The brackets were created from 1-inch square tubing with one side sawed off and an 8mm nut welded inside. To make the head pipes and megaphones more manageable, I inserted some .012-inch stainless steel shims around the head pipes to completely take up the slop in the slip fit. This made them a one-piece part that is easily separated.
Lengthening the throttle cables and shortening the choke cables was accomplished with the correct cable cutting pliers, some unidentified NOS Honda throttle cables (donors for inner wire), a solder pot, some 50/50 solder, and cable ends and ferrules from Flanders. I had to make another special tool to shorten the brass cable ends from 4mm to 3mm. I could not get the solder to wick into the cable strands and almost ruined (melted the housing) my expensive and hard-to-find VT600C choke cable. Solder flux solved this problem and the cables functioned perfectly.
The ignition system install was a pleasure; the ICM fit perfectly on top of the AGM, 5-amp battery. The 2 ignition wiring harnesses were routed inside the frame backbone, exiting through grommets to their place in the super-simple and elegant custom wiring harness on the right and to the pick-up plate on the left side of the cylinder head. I did have to consult with Mark at Probe Engineering to figure out how to remove the terminals from the pick-up plate harness connector so I could run the wires through the grommet.
I fabbed a crankcase breather nipple using a 12X1.25/6AN fitting and threaded it into a modified CB350 dipstick. It connects using a molded Honda breather hose through a ‘Y’ fitting to the upper breather hose and goes right into the catch can which features a clear drain hose to monitor crankcase spew. The breather system exits the can, goes through a custom guide and then is zip-tied to the frame in 2 places before it exits through another custom guide. I welded the frame clips inside the frame for attachment of the zip ties.
I pulled the choke knob out and kicked the engine twice. It sounded dead. Oh no. I checked for spark, and it was normal. The engine started on the first kick once I pushed the choke knob in. The number 40 pilots are a tad rich. It took some air screw fiddling (leaner) to get the idle just right and once I added the requisite safety wire to each throttle cable I was still able to turn the cable adjusters and put a decent synch on the carbs. This was at 4PM on Friday, March 20th. I still had an hour to register for the race. Once on the AHRMA website, I discovered registration ended at noon, Eastern Time. I just lost it, temporarily, and then discovered there was a post registration procedure.
None of the body work was completed yet, and I still needed to drill and wire pretty much everything on the bike. I had previously fabricated a drill jig for flange bolts, and it worked great. I did manage to wreck my Moto-D nut drilling jig and several 1/16 bits during the lock wiring process. The Moto D drill jig will barely last the wiring of one motorcycle before it’s worn out. But my bike is superbly wired and should fly through tech inspection. I wanted to ride it, but my seat was still in pieces, and then, it started raining. It rained for 2 days. I flew to Atlanta on Sunday, the 22nd, knowing I still hadn’t ridden the thing and all of the bodywork lay in primer, applied only a few hours before I left for the airport.
The week prior, I looked at my perfect, original fuel tank emblems. They had been stored in a covered tin box for 4 1/2 years. After smilin’ at them, and caressin’ ‘em, I wrapped them up in some newspaper and put them ‘in a safe place.’ That’s the last I saw of the emblems and was absolutely freakin’ out the next time I looked for them. I dug through the trash 3 times and tore the shop apart. I know I spent at least 6 hours looking for those emblems. I couldn’t show up in the pits without emblems on my tank, especially those beauties I had been so proud of. I told Sheri and Joe I no longer had any desire to go to NOLA. I was done. Too many set-backs, and this one was the ultimate insult.
I was able to get home from Atlanta a little earlier than scheduled on Wednesday night. I searched for the emblems some, and then worked on the fuel tank dents for a few hours. I shot the paint in the garage; I never had time to build the paint booth. I put the final coat of paint on the parts at 4AM. I slept for 3 hours, got up, and began preparing tools, parts, clothes, gear, paperwork, chemicals, pit supplies, canopies and furniture. I still had to modify the 4X8 U-Haul trailer Joe picked up and also assemble the fuel tank, front fender and seat. The rivets I had for the seat snaps were too short and I had to make a special tool to install the correct rivets. Joe made a run to ACE Hardware for rivets and back-up washers. I cut the hell out of my finger on the hastily crafted special tool. The front fender rivets didn’t work and had to be converted to 5mm screws. Too many setbacks, and time’s runnin’ out.
We made the CB350 whole about 2PM, and it finally quit raining earlier that morning. It was time to shake the bike down. I couldn’t hit the track tomorrow not knowing if it was jetted at least close to functional. The brake shoes needed some seating and I hoped it would have all 5 gears in the right places. It ran fine and stopped well. In fact, it ran way good!
We fabricated a 2X4 rack for the bike and bolted it to the floor of the trailer after searching frantically for some long, 8mm bolts. The generator and fuel can, canopies and furniture all fit inside with no chance remotely possible for damage to the freshly minted CB350.
There wasn’t time for one last run through the shop to look for the emblems, but I had to give it one more shot. I opened the near-empty Probe Engineering box the ignition system came in. I had looked in this box 5 or 6 times and only found a plastic bag with a black piece of paper inside that I assumed was leftover ignition stuff. This time, for no apparent reason, I actually picked the baggie up and flipped it over. It was labeled “fuel tank emblems.” Shit. They were in newspaper, but the side I kept looking at looked more like a label than newsprint. I scrunched myself into the trailer, installed the emblems with the awaiting NOS nuts, and we set out on the 9-hour drive to NOLA, at 4PM.
I might have gotten 3 hours of sleep before we headed to the track on Friday morning. I had to get through tech with my bike and gear and we had to get the bike ready and the pits set up before Rider’s School started at 8AM. I was worried about transponder rental and race registration. I was worried about staying awake and concentrating on the classroom. I was concerned about passing this school!
The first track session engulfed me in all kinds of thoughts, concerns and emotions. Would I be able to hold the required lines? Would I even be able to function on this unfamiliar bike after a 30-year roadracing layoff? Would I be able to stay awake? The instructors were somewhat intimidating and there were those darned requirements for actually passing the school.
After a day of classroom and track sessions, I came in third in the mock race. I passed the flags exam and made it through Andrew’s grilling. I was pretty nervous about this part of the exam, but he said I was the only one who answered all the questions properly. It was after 8PM, and dark, when I finally walked down the tower stairs with my diploma.
Back at the pits, Joe was waiting for me, and John Miick had finally arrived. He drove over from Florida to help out and watch all the races. He’s a former Honda rep, roadracer, and long-time motorcycle and guitar pal. With Joe and John helping me out, I had the ultimate support Saturday and Sunday.
I finished this bike Thursday afternoon at 2 PM, just hours before headin’ to NOLA. I guessed on the main jet size, and hit the nail on the head. First oil change after Friday practice (break-in to full synthetic) revealed zero sparkles. The engine had only 10 minutes of run time before I hit the track on Friday.
The AHRMA folks and all the other racers treated us like family. I had to wear the ‘beginner’ vest all weekend. One of my competitors asked, on the grid, if I’d take it off right before Sunday’s race.
My son, Joe, kept it straight, adjusted and shiny. Had a slight cam seal weep that was darkening the points cover gasket. He fixed it with a ‘diaper’ inside the points cover after every outing. Running a Probe Engineering electronic ignition. Engine starts on the first kick.
Sunday’s lap time were consistent: 2:19:919 to 2:20:832. Lost the race by 0.3 seconds. Caught the first place rider in the lappers in turn 7 on the last lap. Tried to pass in 8, 9, 10, 13, 14 and 15. We exited turn 16 a half bike length apart. He pulled me slightly to the finish. He’s running 32mm carbs. I’m running 28mm carbs. Guessed on the gearing, but hit 10,250 at the end of the front straight. 10,500 redline, but had the rev limiter set at 10,250 just to be kind to the new motor. Calculating gearing and tire size, 10,250 was 107 MPH and 10,500 would be 110 MPH. Not bad for mostly stock with 28mm carbs.
Bike ran perfectly, shifted great and stopped ferociously. But drawing a crowd of onlookers all weekend was the best reward of all.
More pix and articles to come. Click on the links at the top of the page, or the menu icon on your mobile device, for stories and photos. Neil's 2016 NOLA Racing Video, starring JK, is at the bottom of the page along with a short clip of the Barber front straight and 5 howling Hondas.
Joe's Motor Company
945 Wesley Ridge Dr.
Spicewood, TX 78669
Phone:
e-Mail: joe.koury@joeshondas.com